Trees in Computer Science and JavaScript
by Nicklas EnvallWhen thinking about trees you are probably not thinking of Computer Science. However, in Computer Science a tree is a data structure. A tree as a data structure allows us to structure nodes hierarchically. Trees can be used and implemented in different ways. This article will give an overview of the following:
- Tree Terminology
- Binary Trees
- Binary Search Trees
- Self-balancing trees
- Tree Traversals
- Binary Search Tree in Javascript
Tree Terminology
A tree is made up of nodes that are connected with edges. The following image shows an example of how a tree might look like:

- Node 10 is the root node. A root node does not have any parents.
- Node 20 is a child node to node 10.
- Node 10 is, therefore, a parent node to node 20.
- Node 20 and 30 are siblings because they share the same parent.
- Node 40, 80 and 90 are all children to node 20. They are also leaves because they do not have any children, this also means that node 30 is a leaf.
- Do you see the lines? Well they are edges, they connect the nodes to each other.
What is the depth and height of a node?
A common problem people have is distinguishing the difference between the depth and height of a node.
- The depth of a node is the number of edges from the root to the node.
- The height of a node is the number of edges from the node to the deepest leaf.
- The height of a tree is a height of the root.
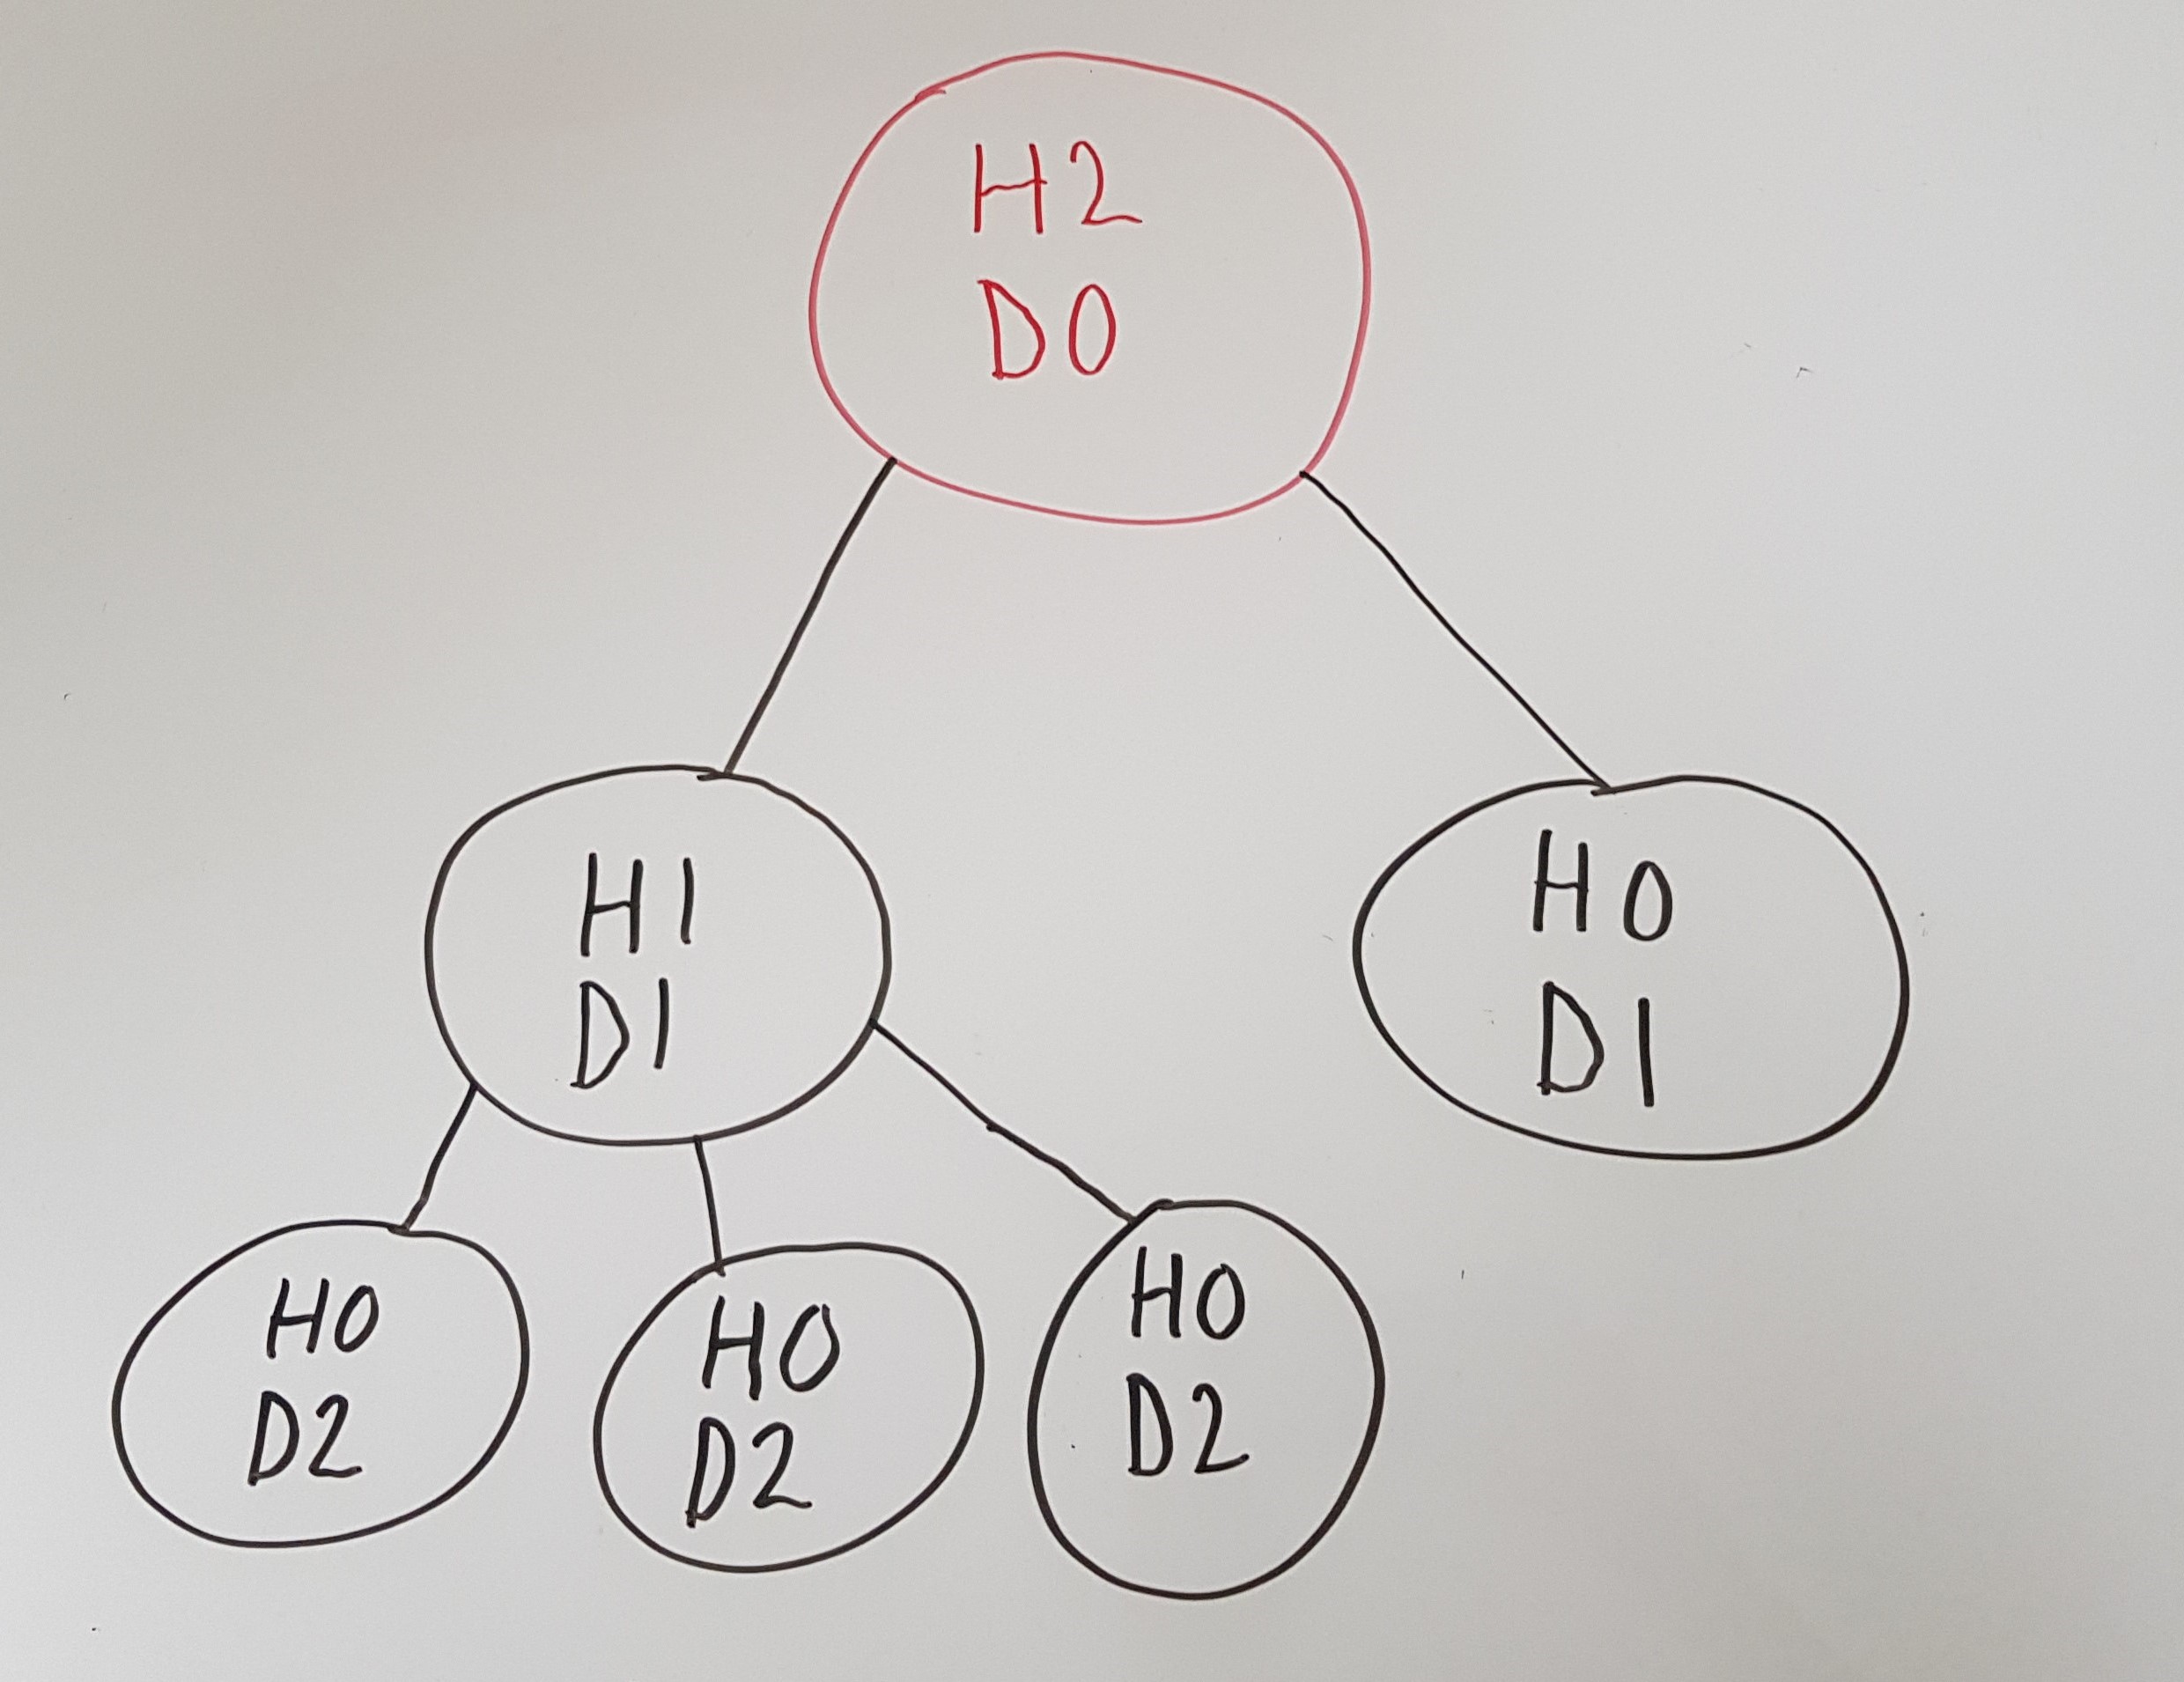
This means that node 20 has a depth of 1 and height of 1, while node 40 has a depth of 2 and height of 0. Let's remove the values of the nodes and just show their respective depth and heights.

Binary Trees
Binary trees are so commonly used that most people might assume you mean a binary tree when you talk about a tree. As you saw in the trees displayed above is that one node had 3 children. Well with Binary Trees we only allow a maximum of 2 children. The two children are often referred to as the left child and right child.
Before continuing, I highly recommend reading our article about algorithm analysis if you are not familiar with Big O notation.
Binary Search Trees
With Binary Search Trees, we store data in a sorted order, which allows us to later on search for a particular item more efficiently. To achieve a sorted order, we have the following crucial conditions:
- A left node's (left child) value is smaller than its parent value
- A right node's (right child) value is higher than its parents value
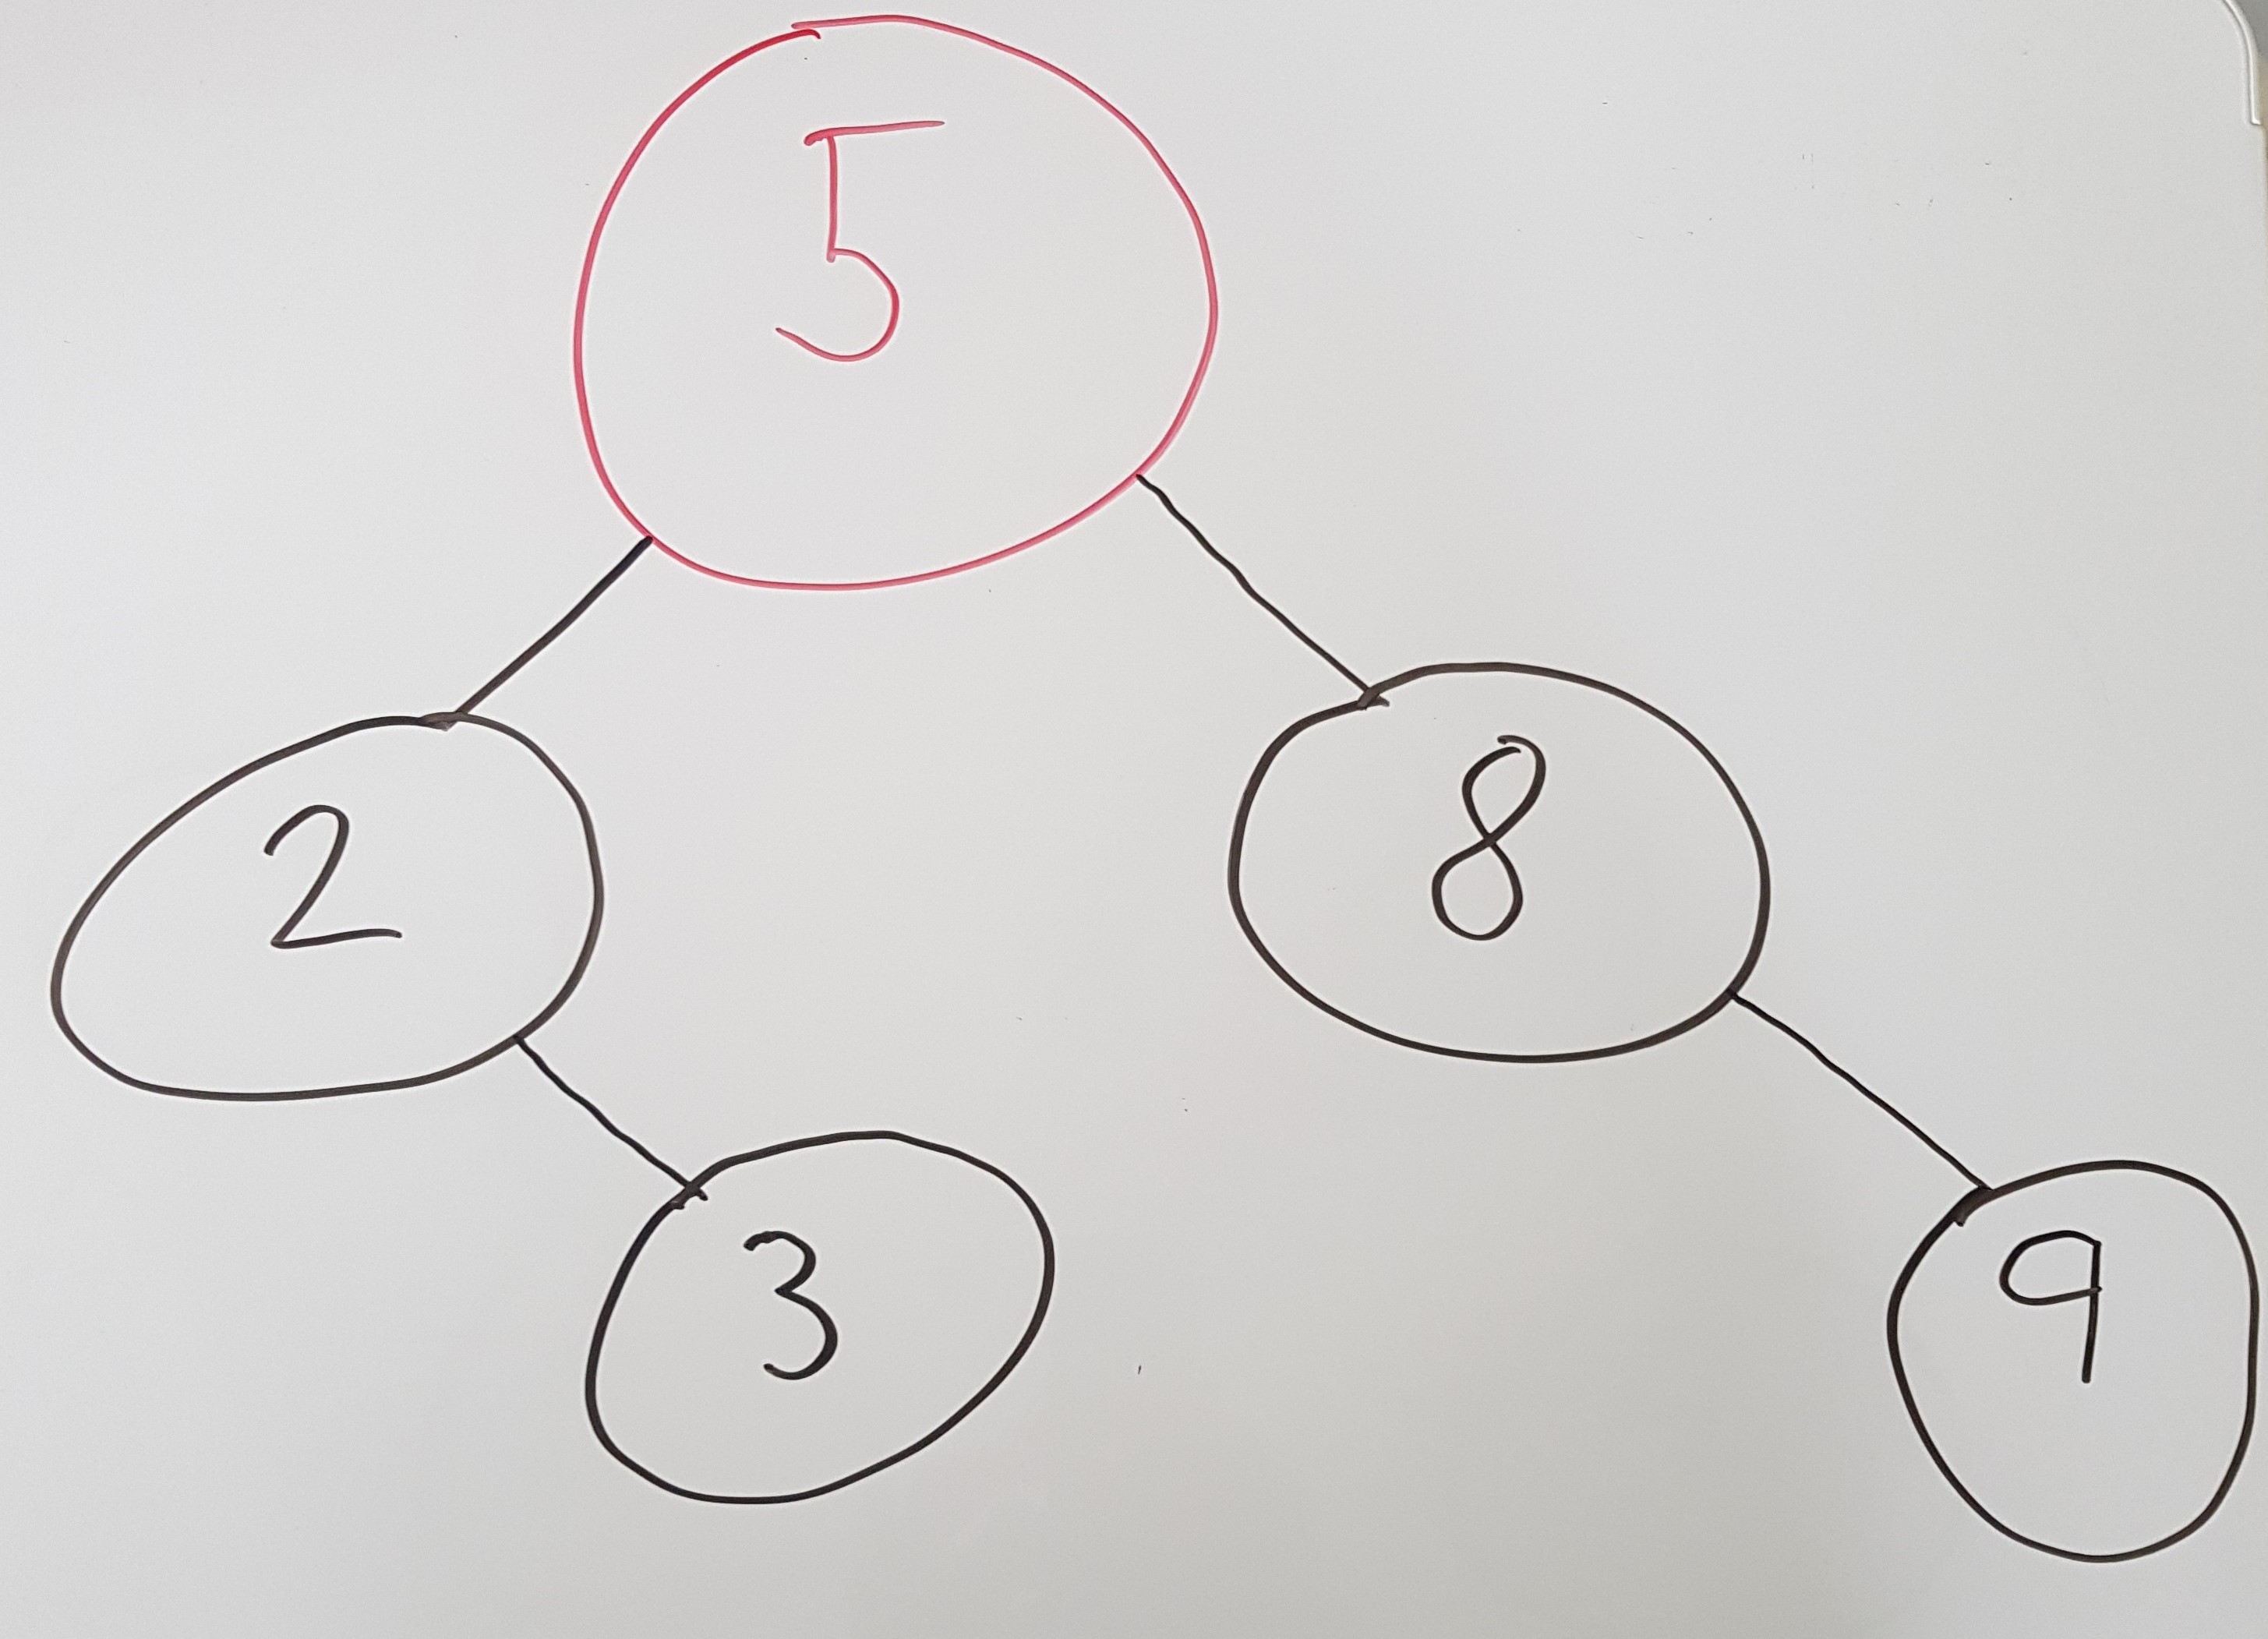
If we insert the following values in the same order, 5, 2, 8, 9 and 3. Then we would get the following Binary Search Tree:

Remember that a tree is a data structure. We store items that we later want to lookup. Which means we probably at a minimum want to be able to, access, insert, search, and delete.
As you see, unlike an array where are the nodes are connected like a straight line, a tree’s nodes are more split up like a tree. Which means that we get an average time of a search in O(log N) because we roughly only have to operate on half the tree.
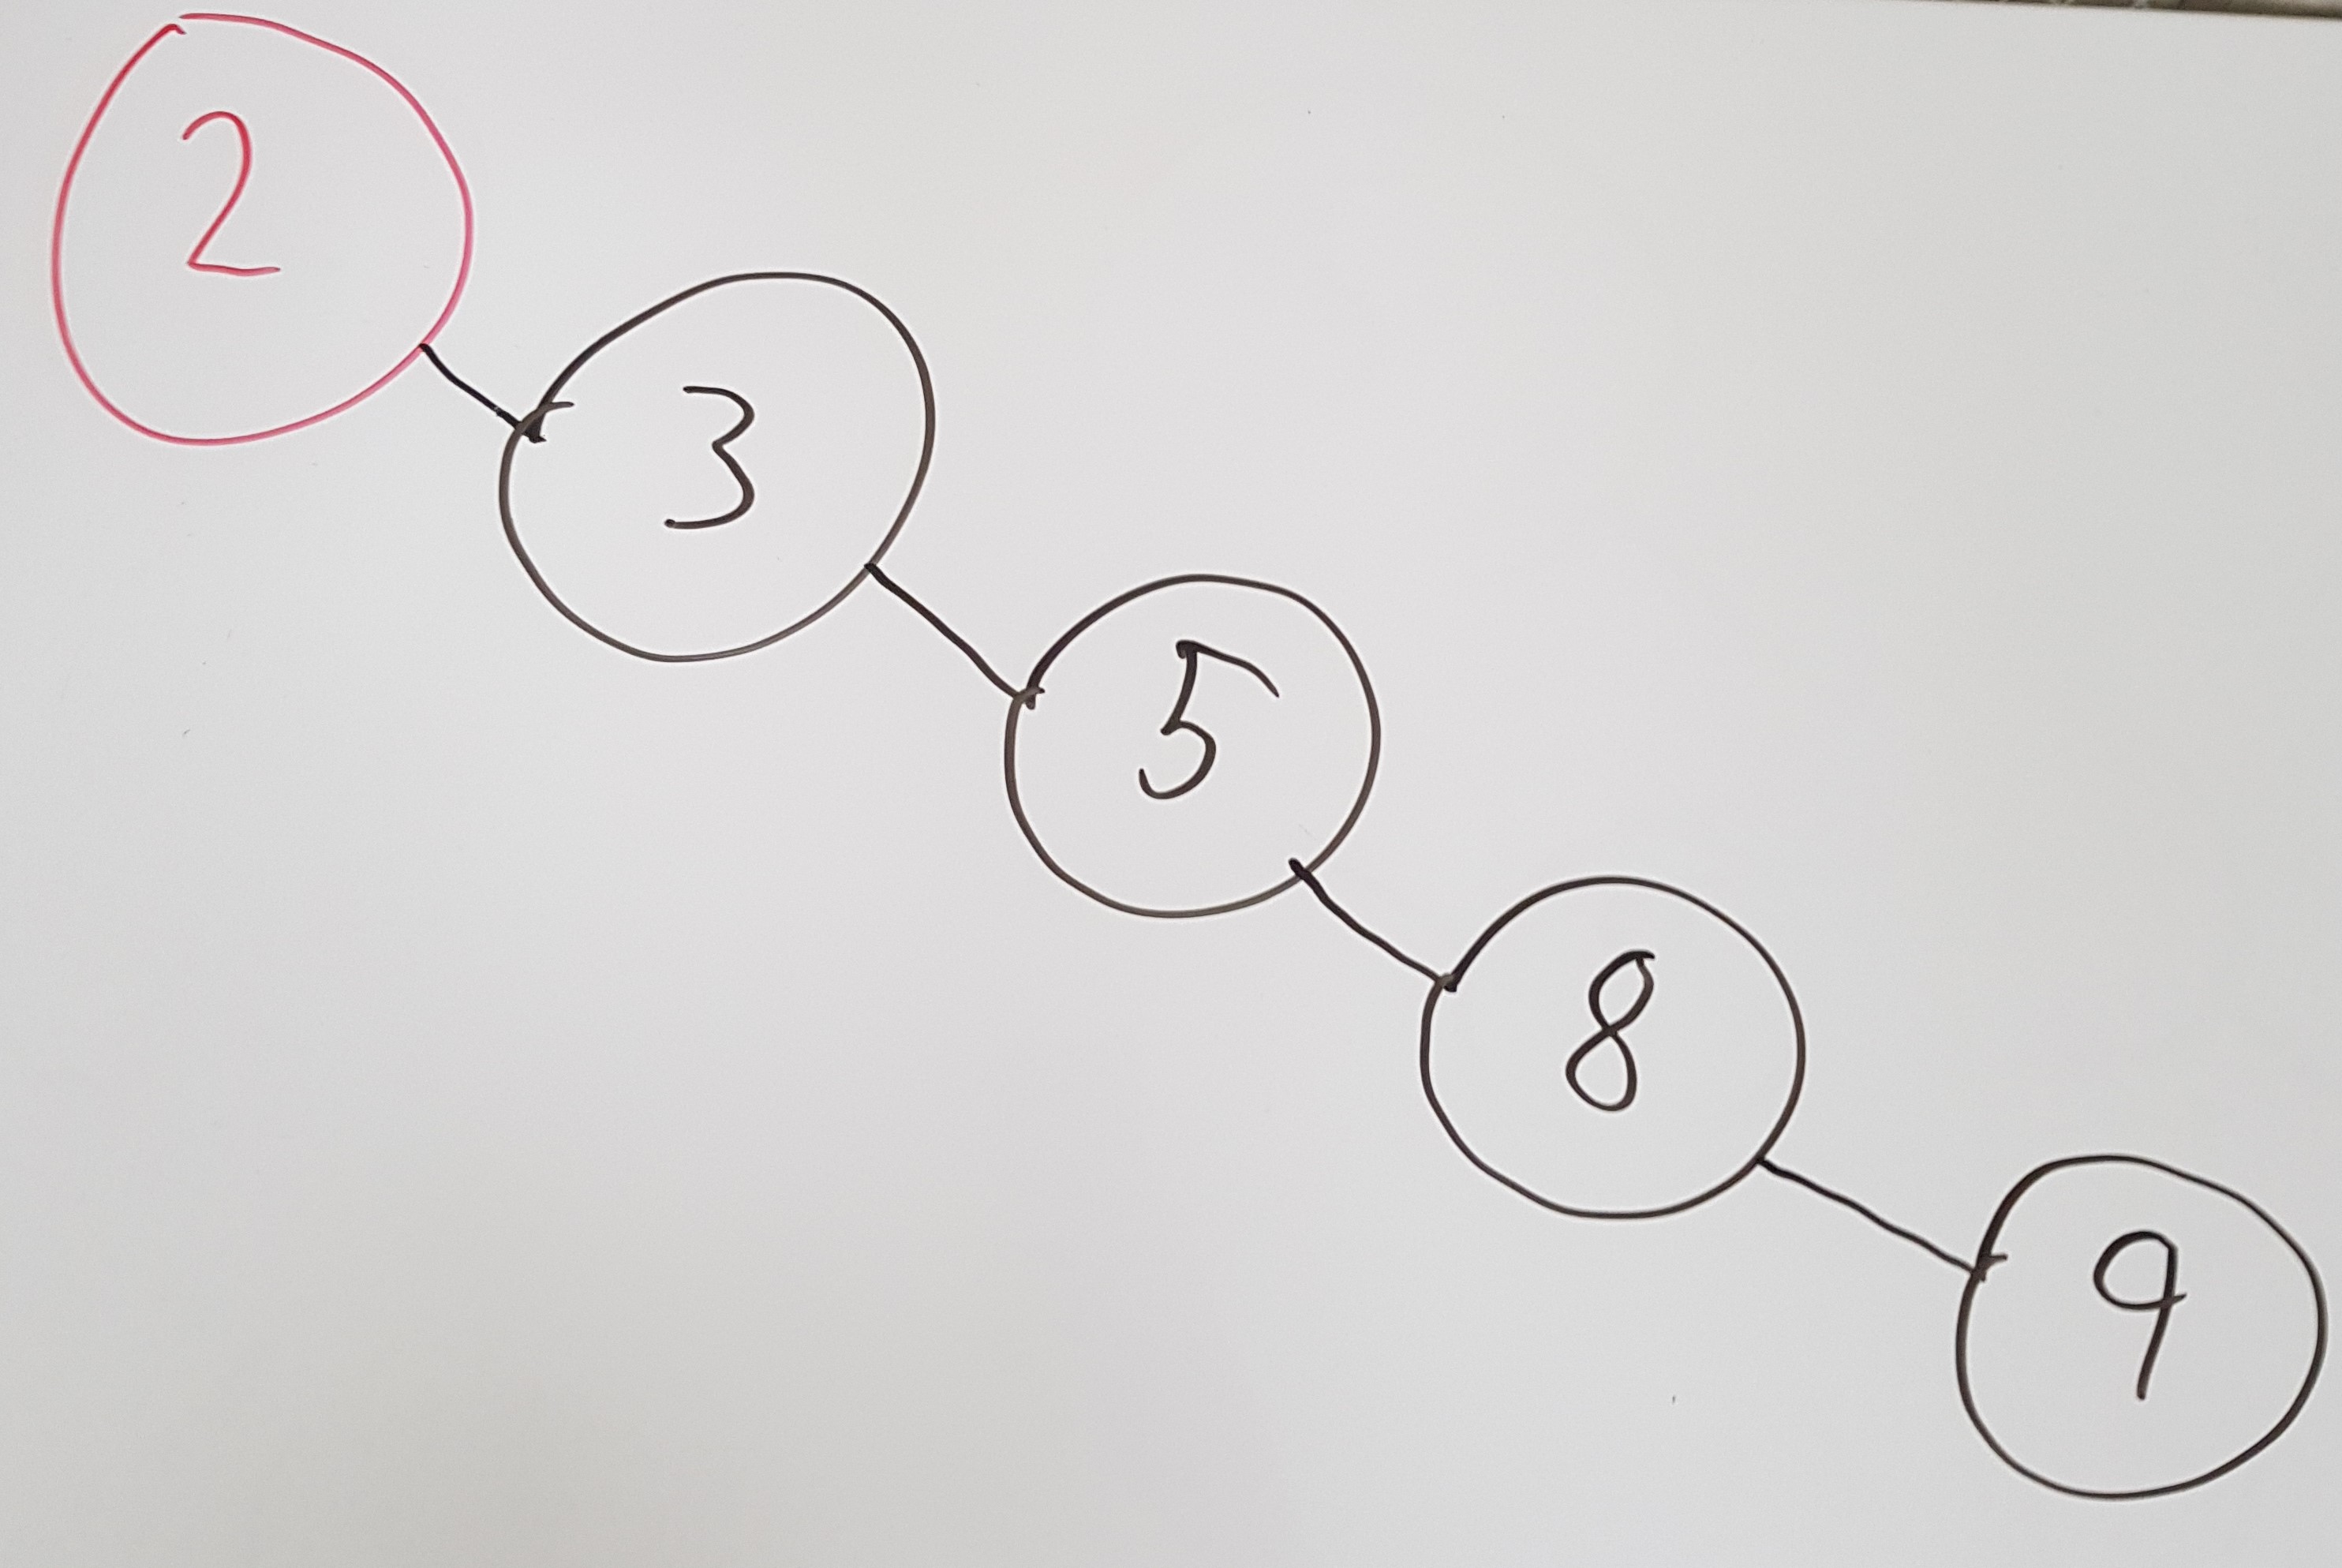
But just like an array, the worst case for search is still O(N). A worst-case of O(N) might seem strange. How can it even be possible with an O(N) worst-case search if we split up the nodes as we do? Well, imagine if the input already was sorted like 2, 3, 5, 8, and 9, before being added to the tree. It would then end up looking like this:

A worst-case search would, therefore, be linear. Do not worry, you do not have to be contempt with a worst-case of O(n). Luckily we can balance the tree by adding an extra condition, which we will investigate now.
Self-balancing trees
Popular self-balancing trees are AVL-tree and Red-Black Tree. They are both Binary Search Trees but with a balance condition. But when is a tree considered unbalanced? It depends on the implementation. The balanced condition makes sure that every leaf has a similar distance to the root. In other words, one leaf is not much deeper than another leaf.
We call AVL-trees and Red-Black Trees self-balancing trees because they re-balance when an unbalance occur, to ensure a worst case of O(log n). AVL-Trees, for example, have a balance condition where the sub-trees of every node may only differ in height by at most 1. To maintain the balance it will rotate the sub-trees when an unbalance occurs.
Tree Traversal
Traversal of a tree entails visiting all the nodes in the tree. With trees, we can traverse in several different orders unlike Arrays and Linked Lists which are linear data structures.
We can traverse in different orders, but why would we want to pick a certain order over another? The simple answer is that what we want to do requires us to traverse in that order.
Three common traversals are, inorder, preorder, postorder. The algorithm for preorder, postorder and inorder traversal for printing out the data of a non-empty binary tree could look like this:
Preorder Traversal:
- Print the root or current node's data.
- Recursively call the preorder function to traverse the left subtree.
- Recursively call the preorder function to traverse the right subtree.
Postorder Traversal:
- Recursively call the postorder function to traverse the left subtree.
- Recursively call the postorder function to traverse the right subtree.
- Print the root or current node's data.
Inorder Traversal:
- Recursively call the inorder function to traverse the left subtree.
- Print the root or current node's data.
- Recursively call the inorder function to traverse the right subtree.
Binary Search Tree in Javascript
Now we will create a simple Binary Search Tree in Javascript. As you will see, we use recursion to traverse through the tree. This implementation is focused for numbers, but can easily be adapted to suit your needs.
Let us start with the node object, as we covered, our nodes can have a left and a right child, and a value, so we'll first create a basic node object:
function Node(data) {
    this.data = data;
    this.left = null;
    this.right = null;
}
We want to our code to be easily readable, so we add the following functions which will help us know whether to go left or right with our node.
const shouldGoLeft = (newNodeValue, oldNodeValue) => newNodeValue < oldNodeValue;
const shouldGoRight = (newNodeValue, oldNodeValue) => newNodeValue > oldNodeValue;
The insert method is pretty straight forward, we'll add it in the node object. We simply traverse the tree and go left or right until we can add it as a child to a node. The method will not allow duplicates of values and returns true or false depending on if it was added or not.
Node.prototype.insert = function (value) {
    if (value === this.data) {
        return false;
    }

    if (shouldGoLeft(value, this.data)) {
        if (this.left === null) {
            this.left = new Node(value);
            return true;
        }
        this.left.insert(value);
    }

    if (shouldGoRight(value, this.data)) {
        if (this.right === null) {
            this.right = new Node(value);
            return true;
        }
        this.right.insert(value);
    }
};
Then we add the search method which we call contains.
Node.prototype.contains = function (value) {
    if (value === this.data) {
        return true;
    }

    if (shouldGoLeft(value, this.data)) {
        if (this.left === null) {
            return false;
        }
        return this.left.contains(value);
    }

    if (shouldGoRight(value, this.data)) {
        if (this.right === null) {
            return false;
        }
        return this.right.contains(value);
    }
};
As you see, we use recursion and always use either the left or right child. Now let us create our BinarySearchTree so we can start using it. As you will see, we keep track of the root node in this object.
function BinarySearchTree() {
    this.root = null;
}

BinarySearchTree.prototype.insert = function (value) {
    if (this.root === null) {
        this.root = new Node(value);
    }
    else {
        this.root.insert(value);
    }
};

BinarySearchTree.prototype.contains = function (value) {
    if (this.root !== null) {
        return this.root.contains(value);
    }
};
Let’s see how the nodes are being added by trying it out.
const bst = new BinarySearchTree()

bst.insert(4)
bst.insert(1)
bst.insert(3)
bst.insert(7)
bst.insert(10)
bst.insert(5)
bst.insert(6)
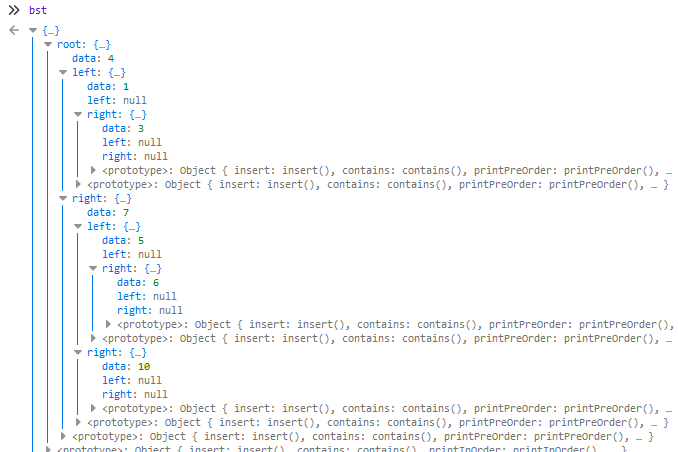
Okay great, as we can see in the image below, each node object is being correctly added as either a right or left child.

Now let us console.log the tree with preorder, postorder and inorder traversal. We only have to follow the steps in the algorithm we saw above. In our node object, we add the following methods:
Node.prototype.printPreOrder = function () {
    console.log(this.data);

    if (this.left !== null) {
        this.left.printPreOrder();
    }

    if (this.right !== null) {
        this.right.printPreOrder();
    }
};

Node.prototype.printPostOrder = function () {
    if (this.left !== null) {
        this.left.printPostOrder();
    }

    if (this.right !== null) {
        this.right.printPostOrder();
    }

    console.log(this.data);
};

Node.prototype.printInOrder = function () {
    if (this.left !== null) {
        this.left.printInOrder();
    }

    console.log(this.data);

    if (this.right !== null) {
        this.right.printInOrder();
    }
};
Which results in (see the bst code here):
bst.printInOrder()   // 1, 3, 4, 5, 6, 7, 10
bst.printPostOrder() // 3, 1, 6, 5, 10, 7, 4
bst.printPreOrder()  // 4, 1, 3, 7, 5, 6, 10
Finally the remove method, this one is the trickiest, hence why most guides out there skip showing it. Why is it the trickiest? Well, think about it, when we remove a node we will also have to ensure that the other nodes are connected, to each other correctly. Let’s map out possible scenarios:
- If the node is a leaf, then just remove it (null it).
- If the node has a right child only, replace it with the right child.
- If the node has a left node only, replace it with the left child.
Pretty straight forward, right? Well, the tricky part is when the node we want to remove has two children. The solution is then to use the minimum value from the nodes right child.
We add a findMin method in our node object to make this process easier. We go left just right until we reach null then we return the data the node contains.
Node.prototype.findMin = function () {
    if (this.left === null) {
        return this.data;
    }

    return this.left.findMin();
};
Then we add the remove method in our BinarySearchTree object.
BinarySearchTree.prototype.remove = function (value) {
    if (this.root !== null) {
        this.removeNode(value, this.root);
    }
};

BinarySearchTree.prototype.removeNode = function (value, node) {
    if (node === null) {
        return value;
    }

    if (value < node.data) {
        node.left = this.removeNode(value, node.left);
    }
    else if (value > node.data) {
        node.right = this.removeNode(value, node.right);
    }
    else if (node.left !== null && node.right !== null) {
        node.data = node.right.findMin();
        node.right = this.removeNode(node.data, node.right);
    }
    else {
        node = (node.left !== null) ? node.left : node.right;
    }
    return node;
};
I have made the code available at this Github repository, in case you want to check out the code in its entirety.